If you want to ensure your renewable energy system operates at peak capacity, you must learn how to clean your solar panels without damaging the sensitive photovoltaic cells. While most systems are designed to be self-sufficient, environmental factors like bird droppings, pollen, and industrial soot can create a film that blocks sunlight. According to the National Renewable Energy Laboratory (NREL) (2022), accumulated dust and debris can reduce solar energy production by up to 7% annually in specific arid regions. Furthermore, built-up grime can lead to “hot spots” where certain cells overheat because they are shaded while others are active. In my experience, a simple seasonal maintenance routine prevents these efficiency drops and extends the overall lifespan of your hardware. This guide provides a professional approach to maintaining your array using standard tools and safe practices to keep your utility bills low and your output high.
Furthermore, staying on top of maintenance allows you to spot physical damage like cracked glass or loose wiring before they become expensive failures. You can find more advice on managing modern residential hardware in our home tech archive. Regular cleaning is not just about aesthetics, it is about protecting a significant financial investment. By following a structured process, you ensure that every square inch of your panels is capturing as much photon energy as possible. Therefore, setting aside a morning every few months for a thorough inspection and wash is one of the most cost-effective things a homeowner can do. Let us look at what you need to get the job done safely.
What you’ll need
- A telescoping pole with a soft-bristle brush attachment or a specialized solar sponge.
- A garden hose with a standard spray nozzle (avoid high-pressure washers).
- Deionized or distilled water if you live in an area with high mineral content (hard water).
- A mild, biodegradable soap such as Simple Green or a dedicated solar cleaning solution.
- A high-quality squeegee with a long handle to prevent water spots.
- Safety equipment including a sturdy ladder and a fall-protection harness if working on a steep roof.
- A soft microfiber cloth for stubborn spots.
Key takeaway: Using the right non-abrasive tools prevents permanent scratches that can permanently degrade your panel performance.
Step-by-step cleaning process
- Check the weather forecast and the temperature of your panels before you begin any work. In practice, you should only clean panels early in the morning or late in the evening when the glass is cool to the touch. According to a study by Google (2023), applying cold water to panels that have been baking in the midday sun can cause the tempered glass to shatter due to thermal shock.
- Shut down your solar inverter and the rapid shutdown switch to ensure no high-voltage current is active during the process. While the panels themselves are sealed, it is a professional standard to de-energize the system to eliminate the risk of electrical faults if a seal is compromised. Consult your system manual to follow the specific power-down sequence for your brand of inverter.
- Remove loose debris such as leaves, twigs, and dry dust using a dry, soft brush or a leaf blower on a low setting. From experience, skipping this step often leads to a muddy slurry that is much harder to wash away once you introduce water. Ensure you clear the gaps between the panels and the roof where birds often build nests and trap moisture.
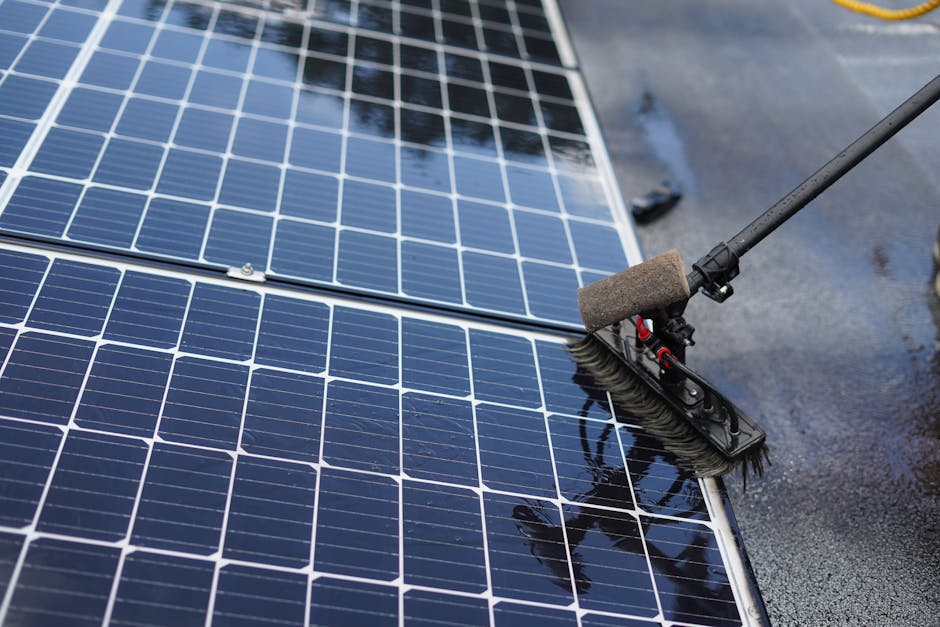
- Rinse the entire array with a gentle stream of water from your garden hose to loosen any hardened bird droppings or tree sap. Avoid using high-pressure power washers because the intense force can compromise the silicone seals around the frame or force water into the junction boxes. If your local tap water is extremely hard, consider using an inline water softener filter to prevent calcium deposits.
- Mix a small amount of mild soap in a bucket of lukewarm water and apply it using your soft-bristle brush on the telescoping pole. Scrub the surface in a circular motion, applying only light pressure to remove the film of grime that water alone cannot shift. Focus specifically on the bottom edges of the panels where dirt tends to settle due to gravity and rain runoff.
- Rinse the panels a second time with clean water to remove all traces of soap suds. Transition quickly to the squeegee phase before the sun has a chance to dry the water and leave mineral streaks. What most guides miss is that even a thin layer of soap residue can attract more dust, leading to faster dirt accumulation in the following weeks.
- Perform a final visual inspection of the mounting hardware and the glass surfaces while the panels are still wet. Look for micro-cracks or signs of “snail trails,” which are dark lines that indicate internal cell damage. Once the panels are completely dry, restart your inverter and check your monitoring app to confirm the power output has returned to expected levels.
Key takeaway: Following a cold-start, low-pressure cleaning sequence protects the physical integrity of the cells while maximizing light absorption.
Common problems and fixes
Persistent hard water spots
If you notice white, chalky circles after cleaning, your local water supply likely has a high mineral content. These spots can reflect light away from the cells, decreasing the total efficiency of the panel. To fix this, use a 1:1 mixture of white vinegar and distilled water to dissolve the minerals, then immediately wipe dry with a microfiber cloth. For long-term prevention, many practitioners use a deionizing water filter attached directly to their hose line.
Oily residue or industrial soot
Homeowners living near busy highways or industrial zones may find a greasy film that soap and water cannot touch. This film is often composed of nitrogen oxides and fine particulates that stick to the glass surface. In these cases, a specialized solar-grade degreaser is necessary to break the chemical bonds without etching the anti-reflective coating. Always test a small corner of one panel first to ensure the cleaner does not react poorly with the frame material.
Stubborn bird droppings
Bird waste is highly acidic and can eventually etch the glass surface if left for several months. If the standard scrubbing doesn’t work, do not use a metal scraper or abrasive pad, as these will cause permanent scratches. Instead, soak a rag in warm soapy water and lay it directly over the spot for ten minutes to soften the material. Once softened, the debris should slide off easily with a soft brush or sponge.
Key takeaway: Use chemical solutions sparingly and always prioritize soaking over mechanical scraping to maintain the panel coating.
When this won’t work
While DIY cleaning is effective for standard maintenance, it will not solve performance issues caused by internal component failure or significant shading from growing trees. If your monitoring software shows a 20% or greater drop in production that persists after cleaning, you may be dealing with a failed micro-inverter or a bypassed diode. Additionally, if your roof is excessively steep or higher than two stories, the safety risks outweigh the benefits of a DIY clean. In these scenarios, hiring a professional solar maintenance firm with specialized robotic cleaners and proper insurance is the only logical choice.
Key takeaway: Recognize the limits of manual cleaning and call a technician for electrical faults or high-risk roof environments.
Taking the time to clean your solar panels ensures you are getting the most out of your green energy investment. By removing the physical barriers between the sun and your photovoltaic cells, you directly influence the ROI of your system. Remember to prioritize safety by working during the coolest parts of the day and using stable equipment. A common mistake here is assuming that rain is enough to keep panels clean, but rain often carries its own pollutants and can leave behind a layer of dust once it evaporates. Therefore, a proactive manual cleaning twice a year is the professional standard for high-performance systems. Your next action should be to check your system’s lifetime production data and schedule your first cleaning for the next overcast morning. Consistent maintenance is the simplest way to turn a standard solar array into a high-efficiency power plant for your home.
Cover image by: Florida Solar Fix / Pexels